Background
The Problem
Initially, I wanted to setup a network attached storage (NAS), not only for storage needs, but be able to access the stored files. Currently, I have many photos and videos that are stored in physical USB hard drives. Unless I plug them into my computer, I cannot access them. Nor do I take them out casually for a scroll to reminisce.
Unlike the ease of having a cloud storage services such as Google Photos, iCloud, or Dropbox where images are stored and accessible from any device, with great integration with one's devices and many ecosystems, they will constantly be paying for these services for their lifetime, and it will only icrease over time. Once an individual has filled up, let's say 50GB of photos and videos, and if they want the ease of having it accessible, they would likely leave these files in the cloud service that they are on. This means that the individual now has to always pay for these 50gb of stored data, and increase cloud storage space if there are new photos and videos made, to be stored. I have also seen instances online where people keep buying the highest storage model iPhone every 2 years because they are filling up storage with photos and videos, that they wish to keep accessible offline on their phone, and now they are buying the 2TB iPhone.
Solutions
Synology or Ugreen?
Before deciding on setting up my own NAS, I was looking into NAS products like the ones from Synology. However, these products are often expensive, and Synology has been tightening or locking their ecosystem to only use their approved set of hard drives, which limits future expandability, if we are using any hard drives not on their approved list. I also saw that Ugreen has also recently started offering NAS enclosures as well, but I was not keen on using their proprietary OS, even though it does seem to be extremely easy and welcoming to use and a product that has everything set up.
NAS OS

Then, I explored the idea of setting up my own NAS. Seeing that there is a growing popularity of self-hosting services, like having your own cloud storage, or setting up a home media server, or have local Large Language Models (LLMs) to use for numerous use cases. I decided to take the plunge and set up my own NAS. At first, I saw that there are a few top choices for NAS OSes, such as TrueNAS, OpenMediaVault, and Unraid. Each has its own pros and cons, and I will not be going into details about them here, but Unraid seems to be the top pick for most people due to its ease of late storage expansion, its stability to run Docker containers and virtual machines and its user-friendly GUI. It sounds amazing because it is the only paid option upfront, and I was not ready to take the plunge and spend money on it yet. So I decided to try out the TrueNAS, which also has a huge community, tons of resources online and is free to use.
Bare Linux OS?
I have also explored an alternative, where there are some individuals online, rather than having a dedicated NAS OS to run their storage needs, they create a Virtual Machine (VM) in their Hypervisor OS and run a barebones Linux OS, and then samba share their storage. Similar to how we can folder share certain files/folders on Windows and MacOS to those within the same local network but rather than running a full complex OS like Windows and MacOS, they just run a barebones and minimal versions of Linux, and then share these files/folders locally.
But there are also advanced users that are able to customize the OS completely to their liking and needs. They can replicate the full capabilities of TrueNAS, like data and hardware monitoring, backups, snapshots and many other storage management functions, and still be able to further expand the functions of the OS.
I think I would attempt to learn to use TrueNAS, as a middle ground in complexity and configurablity, between the ease of a deciated NAS OS from Synology or Ugreen, and a fully custom storage server from a barebones Linux OS.
TrueNAS in a VM or Baremetal?
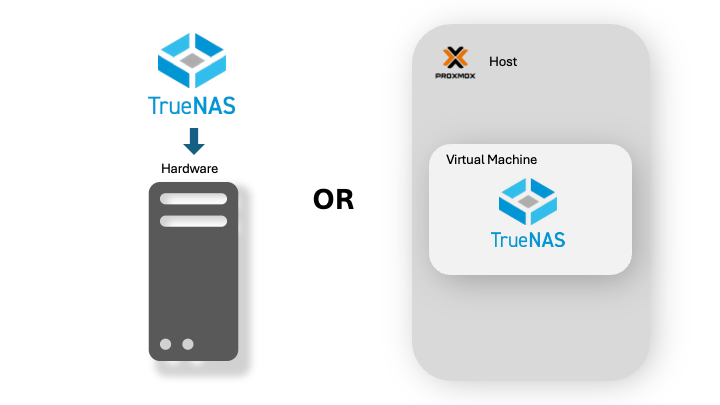
Next, I also looked into the idea of running TrueNAS in a VM, compared to running it on baremetal (installing the OS directly onto the hardware like how we would install Windows directly on a new PC). Many recommended running TrueNAS on baremetal. This is because TrueNAS has recently been able to run docker and linux containers, which is a lighter form of virtualization compared to a full VM, to further extend the functions of the NAS. For example, running a media server like Plex or Jellyfin, running Immich (Google Photos or Photos from iOS alternative), or web server directly within TrueNAS. Running TrueNAS on baremetal ensure stability of having these extended functions. However, I do have also seen some posts and videos stating the virtualization capabilities within TrueNAS while has improved significantly over the years, there are still issues from time to time. If we were to run TrueNAS in a VM, and run these latest added virtualization features, we introduce another layer of virtualization on top of a virtualized OS, which might be prone to instability and performance issues.
Conclusion
Because I would like to expose myself to learning more about virtualizations, setting up local services and using the terminal more, I decided to dwell into using Proxmox Virtual Environment (VE) as my Hypervisor OS, and run TrueNAS in a VM within Proxmox VE. If I would like to extend more functions to my NAS, I will just spin up a new VM within Proxmox VE to run the desired services, and figure out how to access the storage from TrueNAS.
The Easy Part - Setting up Proxmox VE
Installing Proxmox VE was straightforward. I followed the Proxmox VE official documentation, and also followed video instructions from Jay LaCroix from Learn Linux TV and Alex Kretzschmar from Tailscale, and installed it on a spare machine. Just like every other installation of an Operating System (OS) in a new hardware, we would need to flash the OS into a bootable drive. Any USB flash drive will do. We will need to use Rufus, if your primary device is Windows, and Etcher if you are on MacOS. There are also specific instructions provided by Proxmox VE official documentation on preparing the bootable drive on several platforms.
There are options for a Graphical User Interface (GUI) install, or console install. I picked the GUI one because who does not like a simple GUI installation. We will then need to set up which storage device will it boot from, if I am not mistaken, we are able to actually leave the OS within the USB drive that are booting into for the OS installation process. However, we risk the crashing the server if we accidentally remove the USB drive. After selecting the boot drive and the file format we are running in, we can place attach our public domain to it, which allows us to access it on the public internet directly. However, I have not explored the implementation of this option and the security risk behind exposing a hypervisor OS publicly this way. Instead, I have just exposed it on my local network. Then, we set up a username and password, and it is accessible via https://youripaddress:8006.
Installing Tailscale
The first thing I did was to create a Linux Container (LXC) on Proxmox VE to install Tailscale. Following the video and documentation by Tailscale and also extra reference video from MRP, I was able to successfully install Tailscale on Proxmox VE.
First, we will need to download a lightweight Linux OS for the container and booting into it. We can do this via the Proxmox VE web GUI or we can also do this via the console. Of course, it is easier with the given GUI. Then, we are required to enable port forwarding in the LXC container by accessing the /etc/sysctl.conf file and uncomment the net.ipv4.ip_forward and net.ipv6.conf.all.forwarding lines.
Then, on the Proxmox VE host, we access the /etc/pve/lxc/containerID.conf and add the following lines:
lxc.cgroup.devices.allow: c 10:200 rwm
lxc.mount.entry: /dev/net/tun dev/net/tun none bind,create=file
Finally, we go back to the Tailscale-installed LXC Container, and to log into our own account. The command to do so is tailscale up, but we will need to add few more commands as we'd like to also have this LXC act as an exit-node and subnet router.
tailscale up --advertise-routes=[IP_ADDRESS] --advertise-exit-nodeThis will prompt an Single Sign-On (SSO) login page, where we can log in with our Tailscale account. Then, we will need to approve it as an exit-node and subnet router, on the Tailscale admin console.
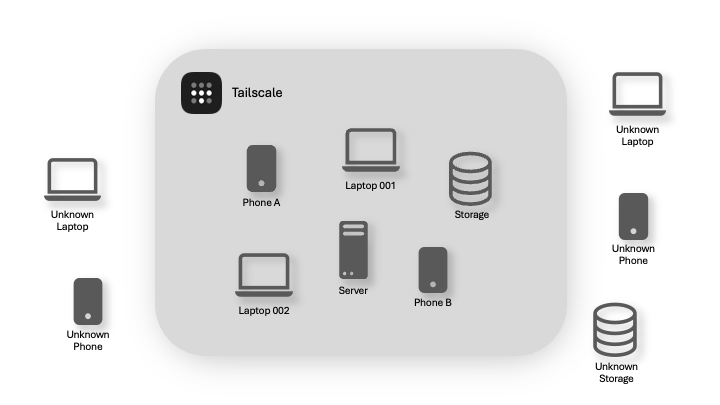
By logging in, we are registering the device, or for this case the LXC Container, to the Tailscale account. Devices that are registered with the same Tailscale account, are all in the 'tailnet'. When these devices have Tailscale enabled, they will be able to access each other as if they were on the same local network. That is the convenience of this service. It abstracts the network layer and difficulty on accessing.
But for our case, because we enabled advertise-routes and advertise-exit-node, we are able to access the Proxmox VE host from another devices within the 'tailnet' (devices registered with Tailscale). Additionally, services running on the Proxmox VE host will also be accessible. This will allow us to access services running on the Proxmox VE host from another devices within the 'tailnet', regardless if it is on the public internet or on the local network.
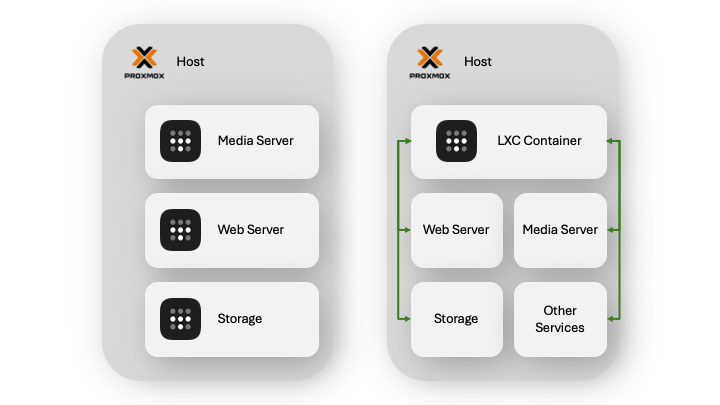
As shown in the image above, on the left side, we can actually skip the complexity of setting up the port forwarding and LXC container, and install Tailscale in every single VM and/or services within Proxmox VE, and access each service this way. Every service will look like its own separate device.
Installing TrueNAS in a VM
Pre-requisite - Hardware Requirement
Before installing TrueNAS in a VM, I was reading up and looking online for guides and documentations. I came across a few articles and videos that suggested that it is possible to run TrueNAS in a VM, but it is not recommended to run it in a VM.
However, I decided to give it a try anyway. I saw that the official site from TrueNAS has some recommendations on how to install TrueNAS in a VM, and I followed it.
Based on the blog post by TrueNAS, we will need allow hardware passthrough for the VM to directly access the storage devices. This is because the ZFS file system being used by TrueNAS takes the role of RAID controller, volume manager, and file system all into a single software component. This file format expects direct access to the storage disks in order to work properly, as it issues direct SCSI or SATA commands.
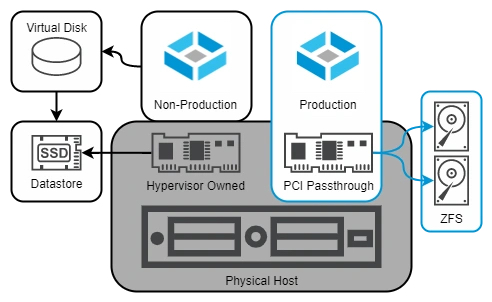
Because of the requirement of the hardware passthrough, we will need to have an additional storage controller that is not being used by the hypervisor. It is suggested in the TrueNAS blog post, to use a Host Bust Adapter (HBA) supported by TrueNAS, such as an LSI/Broadcom/Avago controller from the SAS2308 or newer chipset family.
Next Steps
Need to learn to move installation and configuration to a different machine.
Resources
- Proxmox VE Documentation
- TrueNAS Blog on Virtualizing TrueNAS
- Proxmox Full Course by Jay LaCroix from Learn Linux TV
- Proxmox Installation Guide by Alex Kretzschmar from Tailscale
- Synology requires self-branded drives for some consumer NAS systems, drops full functionality and support for third-party HDDs
- Synology to require branded hard drives for future NAS models
- Synology is tightening restrictions on third-party NAS hard drives