Introduction
Building a portfolio site today feels like a tug-of-war between convenience and control. On one hand, you have platforms like GitHub Pages, WordPress or Blogger. On the other, you have the raw power of manual coding. One could also host it with hosting services like Hostiger, DigitalOcean or AWS, etc. My journey led me somewhere in the middle. A self-hosted, automated, and securely exposed setup that satisfies the "homelabber" in me.
Issues: The Usual Suspects
I wanted a place to showcase my projects and experiences that wasn't just another profile on a third-party service like GitHub or WordPress. Having touched raw HTML, CSS, PHP and JavaScript during my studies during diploma and degree, I felt a "refresh" was in order.
However, I quickly remembered why manual web development is a marathon. Building from scratch means managing every individual page. I realized that:
-
Repeated Code Replication: Copy-pasting the same navigation bar, footer and any design snippets across numerous different HTML files is a recipe for maintenance nightmares, making it extremely tedious whenever I needed to make changes to any portion of the site. If I want to add a single link to my menu, I’d have to edit every single file on the site.
-
Content Management is Tedious: Manually formatting every new blog post as a unique file becomes a chore, and only magnifies the point above. Every component or snippets of a page requires manual pasting all over. Additionally, it discourages writing because the "overhead" of creating a new page is so high.
-
Manual Styling for Everything: Styling each pages can also be tedious with CSS and PHP or JavaScript. While it allows total control and customizability, doing it from scratch is a slow process. Furthermore, modern web standards (like mobile responsiveness and sizing) are difficult to get right without help.
The Solution
Enter Eleventy (11ty)
After some searching, I landed on Eleventy. It stood out because it’s a Static Site Generator (SSG) that allows you to manage individual repeated portions of the website (like the nav bar and footer) as templates. With Eleventy, I can easily create many blog posts without managing individual HTML files, making the "manual" feel of web design much more manageable. It supports the use of markdown which allows blog posts to be written in markdown and Eleventy will generate the corresponding HTML pages.
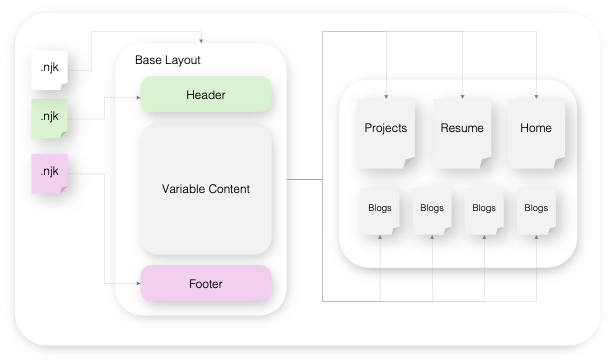
It supports templating of pages, where we build a base layout, that can be generally applied for most pages. Components such as navigation bars, footers or other snippets of code, can be split into individual files. Then, we can reference the individual files or components into the base layout. This way, we only need to manage a handful and specific files that can be applied to the whole site. An illustration and code examples are shown below.
Header File
<!-- Navigation bar from Bootstrap -->
<!-- https://getbootstrap.com/docs/5.3/components/navbar/ -->
<nav class="navbar bg-body-tertiary">
  <div class="container-fluid">
    <a class="navbar-brand" href="#">
      <img
        src="/docs/5.3/assets/brand/bootstrap-logo.svg"
        alt="Logo"
        width="30"
        height="24"
        class="d-inline-block align-text-top"
      />
      Bootstrap
    </a>
  </div>
</nav>
Footer File
<!-- Footer from Bootstrap -->
<!-- https://getbootstrap.com/docs/5.3/examples/footers/ -->
<div class="container">
  <footer class="py-3 my-4">
    <ul class="nav justify-content-center border-bottom pb-3 mb-3">
      <li class="nav-item">
        <a href="#" class="nav-link px-2 text-body-secondary">Home</a>
      </li>
      <li class="nav-item">
        <a href="#" class="nav-link px-2 text-body-secondary">Features</a>
      </li>
      <li class="nav-item">
        <a href="#" class="nav-link px-2 text-body-secondary">Pricing</a>
      </li>
      <li class="nav-item">
        <a href="#" class="nav-link px-2 text-body-secondary">FAQs</a>
      </li>
      <li class="nav-item">
        <a href="#" class="nav-link px-2 text-body-secondary">About</a>
      </li>
    </ul>
    <p class="text-center text-body-secondary">© 2025 Company, Inc</p>
  </footer>
</div>
Base Layout File
<!DOCTYPE html>
{% include '/path/to/htmlHeader.njk' %}

<body>
  {% include '/path/to/header.njk' %}

  <div class="content">{{ content | safe }}</div>

  {% include '/path/to/footer.njk'%}
</body>
On Any Other Page
----
base: baseLayout.njk
----

<!-- Any code here will appear in '{{ content | safe }}'>
With this templating, it enables us to manage a handful of pages, that determine the full look of the site. The icing on top, is that 11ty has a live local server as well, where we can make changes to any of the code, and watch the changes apply immediately without any additional external tools, using the following command:
npx eleventy --serve11ty also outputs the final outcome of the site to a default folder, _site, which can be renamed to whatever you want to call your output folder in the .eleventy.js configuration file. We will only need to use this folder consisting of the final output site, directly into a web server.
Bring on Bootstrap
To not manually style everything from scratch, and customizing every component, we need to use a CSS framework. While there are an increasing number of them to choose from, I vaguely remember bootstrap being mentioned somewhere that it was a simple framework and decided to give it a go. Especially because upon browsing their documentation, they also had many ready-made template components on their site, that can easily be implemented swiftly. Additionally, we can also customize them with css keywords within html pages with the class attribute. Allowing us to customize the look we want, without digging deep into CSS. Bootstrap is called an opinionated CSS framework, where many of the design decisions, has already been made. Hence, I saw some comments online stating that sites built with Bootstrap, always have a "Bootstrap" look to it. However, having many components ready to implement, seems to be a win to me.
For example, using the header and footer code above, we can very quickly implement them just by copying them, and easily style the outer container with class attribute. I will be styling the it being a card (card) that react like a small container (container-sm), with large shadow (shadow-lg), rounded corners (rounded-4) with padding (p-3).
<!-- Surrounding Container -->
<div class="card container-sm shadow-lg rounded-4 p3">
  <!-- header / footer file code here -->
</div>
Header File Output
Footer File Output
© 2025 Company, Inc
Note: The links in the header and footer demonstration are clickable, it will bring you to the top.
The Infrastructure: Proxmox & Virtualization
Since I am currently experimenting with Proxmox, it was a no-brainer to host this site myself. I spun up a dedicated Virtual Machine (VM) with minimal resources specifically for this site. Using a VM ensures that my portfolio is isolated from my other lab experiments; if I break a container elsewhere, the site stays up, and keeps it segregated from everything else. I have installed Debian for this specific VM and enabled remote login via SSH. Then, installed Tailscale using the following:
For a simple and quick installation of tailscale:
curl -fsSL https://tailscale.com/install.sh | shOr we could visit their site and locate the linux distro of your choice for a more specific installation.
Once installed, we log in with the following command which will prompt a URL for us to log into our Tailscale account with.
sudo tailscale upThe Magic Link: Tailscale Funnel
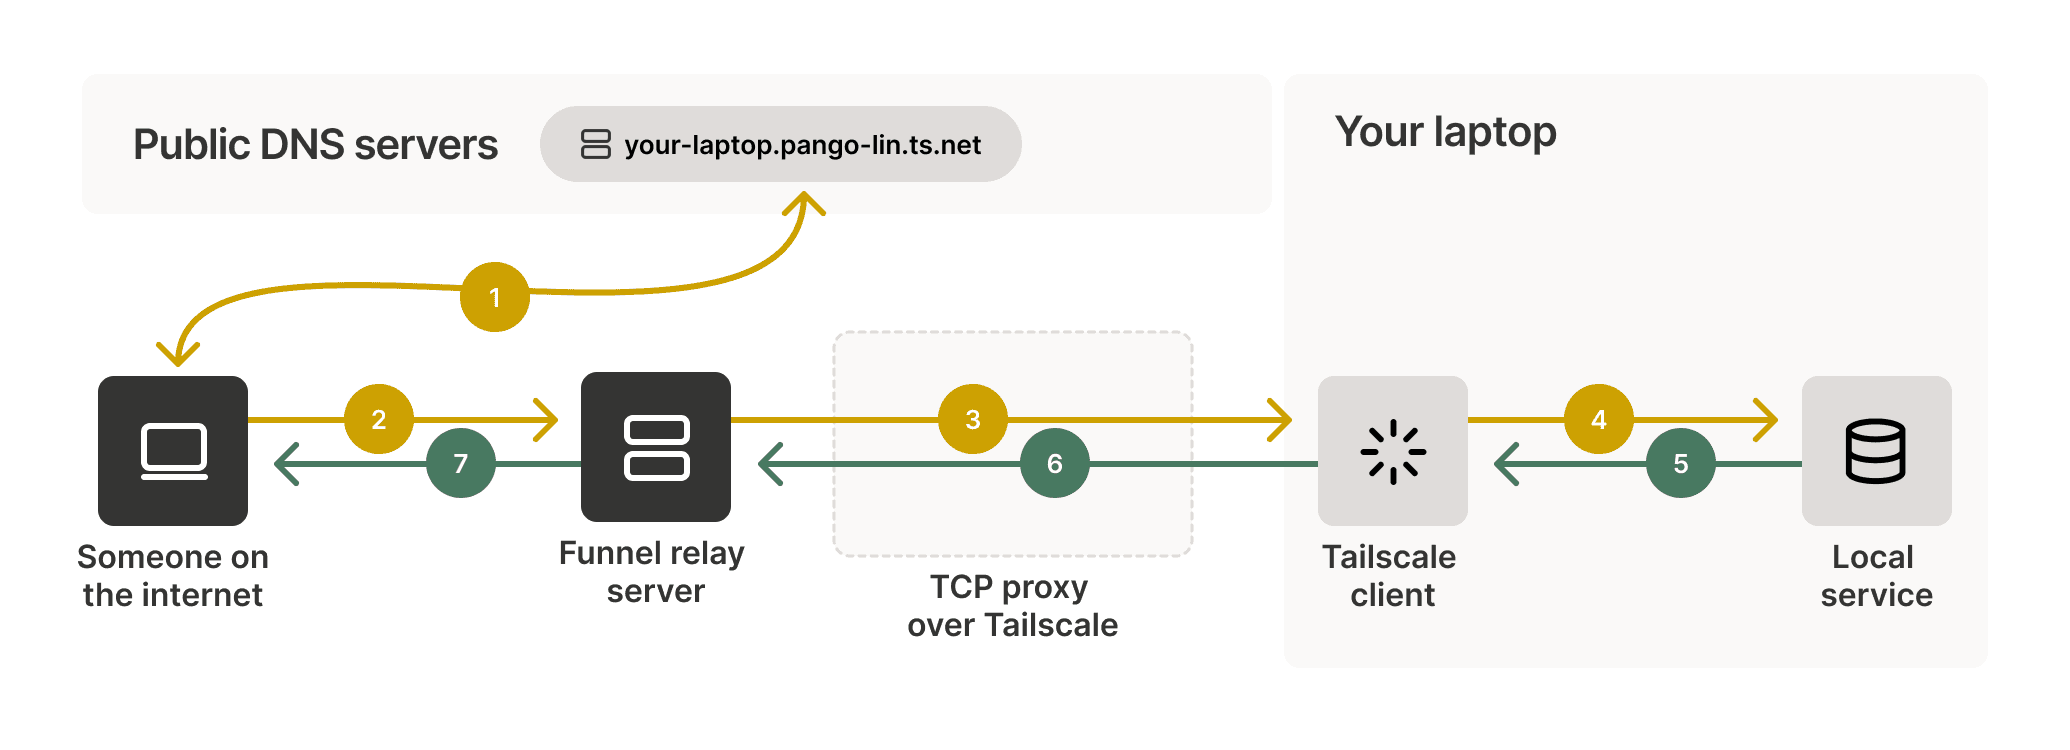
The biggest hurdle to self-hosting is the network. Port forwarding is a security risk, and dynamic DNS is a headache. Tailscale Funnel changed everything. It "obfuscates" the networking difficulty by routing my local VM service directly to a public URL via Tailscale's servers, as shown in the Tailscale image below. The benefits are:
-
No Open Ports: I don't have to touch my router's firewall.
-
Encrypted & Secure: It uses Tailscale’s nodes to proxy traffic safely.
-
One Command: Running
tailscale funnel <port or specific folder>instantly makes it live to the world.sudo tailscale funnel /path/to/_site sudo tailscale funnel port_number
More examples shown in their documentation on how to use it, as we could expose specific ports, or even expose several services at once.
How I Use It?
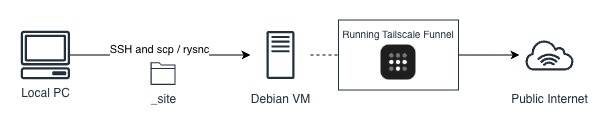
For my case, I funnel the path to the folder. Because 11ty outputs the final output in a folder _site, all I need to do is remotely log into the VM, and use rsync or scp commands to sync or copy over the latest local output folder to the VM. Without even restarting the VM or the Tailscale Funnel service, the website will be updated immediately, which allows for local development on any local machine, and then uploading the changes to see immediate changes.
# Copy / Overwrite Files
scp -r _site <user_account>@<ip_address>:/path/to/folder

# Sync Files - Only looks for differences between local folder and destination folder
rsync -avzh _site <user_account>@<ip.address>:/path/to/folder
A Temporary Bridge
While Tailscale Funnel is fantastic, I view it as a temporary solution. I am still looking into ways to host the site "truly" manually, perhaps through direct DNS management or a more traditional web server configuration. While it will take some time as based on quick search, many of warned the difficulty and tediousness of managing a truly self hosted server due to the effort required for maintenance and security concerns.
Alternate Solution
During this process, I also discovered Cloudflare Tunnels. It serves a very similar function to Tailscale Funnel, providing a secure way to connect your local resources publicly, via the Cloudflare network. It is definitely something I plan to explore in the future as I refine my hosting stack.
Final Thoughts
This project was a perfect blend of my interests. I got to refresh my frontend skills with Bootstrap, streamline my workflow with Eleventy, and flex my sysadmin muscles with Proxmox and Tailscale. It’s a work in progress, but seeing a local VM live on the internet is an incredibly satisfying milestone.